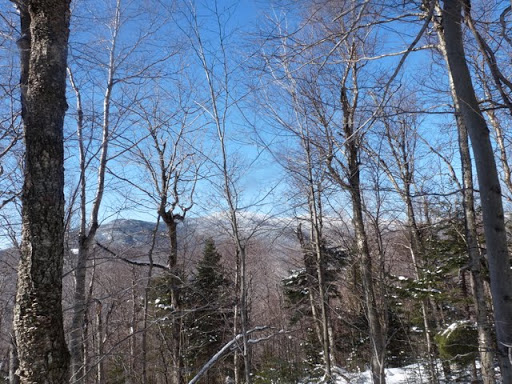
Would a polarizing filter have helped?

vftt.org

Help Support vftt.org:

This site may earn a commission from merchant affiliate links, including eBay, Amazon, and others.

Mohamed Ellozy

Well-known member
VFTT Supporter
Joined
Sep 3, 2003
Messages
2,259
Reaction score
180
Location
Brookline, MA
In another thread Dave Metsky posted this photo:

IMG_1534.JPG


Note the glorious color of the sky!

At about the same time I took a similar, but far less successful photo:

P1000708.JPG


I am sure that Dave used a far better camera (mine is a Panasonic DMC-FZ28), and he obviously has far more knowledge than I do.

Yesterday I read in Dave Pogue's Digital Photography -- The Missing Manual:
A polarizing filter is ... and it does some real magic for landscape photos. Specifically, it turns the sky a beautiful, rich blue; it also ...

Panasonic sells a polarizing filter for my model, would it help?

Many thanks!

For more photos from that trip please visit Liberty Spring Winter :)
 
Last edited:
I don't think the Metsky-Ellozy images are good ones for comparison upon which to base the polarizing filter question. The M photo is (relatively) a detail shot, while the E pic is a broader landscape with a different range of tonal values. Image #5 from Mohamed's linked Liberty Spring Winter collection would allow for more direct comparison.

Quite honestly, I do not see a great difference in rendition of the sky between the two photos. (Or between M's pic and the E#5 image.) However, the M photo probably received less exposure, resulting in a somewhat more saturated and darker blue sky.

I don't think we're seeing the difference between polarized and non-polarized shots.

G.
 
Since my camera is a simple P&S (Canon SD800) I don't necessarily think that's the difference. I do shoot in manual mode, but you don't have many options with it. I had ISO set to 100, White Balance set to Sunny Day, and exposure at -2/3. And I ran it though some basic color correction in Picasa (I Feel Lucky :) ).

Run the shot through basic color correction in Picasa and that should enhance the sky somewhat.
 
... I had ISO set to 100, White Balance set to Sunny Day, and exposure at -2/3. ...

That tells the story, in my view. Less exposure = greater color saturation (within some limits).

G.
 
Dave's pic is aimed up at a fairly high angle and thus misses much of the haze. Mohamed's picture is aimed a lot lower (including the horizon) and includes much of the haze. Note that the blue in the upper part of Mohamed's pic is similar to the blue near the bottom of Dave's pic.

The pictures were probably taken at different places and times so the amount of haze in the atmosphere could also differ which makes any comparisons pretty weak.

Doug
 
Thanks to both of you ... I am trying to learn more.

"I'm feeling lucky" made no perceptible change to that photo, though it has often improved others.

My camera has all the controls that Dave used, so I will experiment with them one day when I am hiking alone.
 
Most of the time, on clear days and/or above treeline, I shoot with the exposure compensation at -1/3, or -2/3. This is on the Canon A570-IS. I use the CHDK firmware to see the live histogram, which is incredibly helpful! (Thanks, Dave!)

Tim
 
I started posting my reply before your previous comment was posted. Still, not a reason not to experiment :)

You and Grumpy make the point that I was, to some extent, comparing apples and oranges. Grumpy points out that that this photo is more comparable to Dave's
 
I don't have the technical expertise of some of our members here, but I'll put in my two cents worth. I would heartily recommend the polarizer if they make one for your camera. Not sure if the two photos given as examples would be improved by the filter, but I can say that a circular polarizer can give you much better, deeper hues in the sky most of the time. It also can reduce reflections on any surface, such as water, which can come in handy if you want to photograph what is in the water rather than the reflection on the surface.

The one downside is that it stops down the light a bit, so in dimly lit situations you may need to use a tripod or a faster iso speed to prevent blurry shots.

I always pack one with my camera, as I feel it is an essential tool. Hope this helps. :)
 
Also, there have been other polarizer discussions here, and one of the important points to note is that the polarizer is most effective when light is striking at an angle (thus being polarized). You will find that at noon (1pm) on a summer day, a polarizer will do almost nothing for the sky. Early or late in the day, or in winter when the sun stays low all day, you will see a much greater difference with the filter. That's just sky. Surfaces provide their own angle of polarization, that's how a filter cuts the reflection off water or the glare off a road surface.
 
A polarizer is also most effective at reducing haze when shooting at right angles to the sun direction and ineffective when shooting toward or away from the sun. They create a weird effect with wide angle lenses by reducing the haze in part of the sky but not the other part.

You can simulate the effect of a polarizer by looking through one lens of a pair of polarizing sunglasses and rotating the lens. (Sunglasses generally also have light-reducing filter in addition to a polarizing filter whereas a camera filter will just have the polarizing filter.)

Tutorials:
http://www.luminous-landscape.com/tutorials/polarizers.shtml
http://www.kenrockwell.com/tech/filters.htm
http://www.great-landscape-photography.com/polarizing-filter.html
http://www.offrench.net/photos/articles/polarizing_filter.php

Doug
 
Last edited:
... My camera has all the controls that Dave used, so I will experiment with them one day when I am hiking alone.

I think this is the way to go before spending a bunch of money on a specialized gadget that may (or may not) get you the results you want. If you can get your desired results by manipulating exposure, you have opened the door to working more quickly, as well.

My suggestion is that you shoot a given scene at several different exposure compensation points, from say -1 to +1, at 1/3 (stop) intervals. Keep track of sequence so you know what you did on each image, and compare the results. This simple experiment will yield useful information that you can carry in your "knowledge kit" to use in the field.

(I am not anti-polarizing filter, having used the things rather extensively over the years. But a polarizing filter definitely is not a panacea, and if you can achieve the results you want in most cases via a simpler, less costly solution, why not?)

G.
 
Mohamed

If you're interested check out photos 12 and 13 here. These two photos were shot within a minute of each other. I intentionally took #12 with the polarizing filter at its minimum effect, and I took #13 with the filter at its maximum effect. Notice in #13 the greens get greener, the sky gets bluer, the clouds (all 1.5 of them) show up, and the glare off the water is reduced. Personally I love the seeing-through-the-water benefit of a pol filter (best when at an angle of ~30 degrees above the water, give or take). Anyway, just average photos that we've all seen dozens of times, but it shows what the filter can do. I usually put the filter on when I hit treeline.......in the forest I don't use it, it slows down shutter speed too much (unless I have my tripod). Yes, in wide angle shots the blue-ness of the sky will fade as the scene gets closer to 0 or 180 to the sun, but it's a tradeoff I'll almost always take.
 
That is an excellent photo comparison, Billy, for the multiple polarizing effects they illustrate.

One other curious effect in your photos is that the mass of Mount Washington appears lighter in photo #13 (the maximum polarizer effect) than it is in #12. In general a polarizer filter does not have much effect on dry, non-shiny surfaces, such as rocks. If the rocks were wet/shiny or contained mica or some shiny metal then the glare on the rocks might be removed by the polarizer. In that case the tone of the rocks would get darker. But in your photo the rock pile of Washington became lighter. I believe what is happening is the relative contrast between the sky and the rock pile has reversed. In photo #12 the sky is lighter than the rock pile, but in #13 the sky is now darker than the rock pile. In each photo the camera meter is trying to render the entire scene an overall 12-13% gray -- as that is what most camera meters are programmed to do. The consequence is that Mount Washington now appears much lighter in #13 than it is in #12. It is kind of an unintended consequence of using the polarizer, not necessarily a negative effect in your photos.

I remember several decades ago taking a photo on the summit of Mt Washington. It was a bright clear sunny day devoid of any clouds. I photographed one of the summit buildings against the bright blue sky, and I absent mindedly turned the polarizer to the maximum effect. The effect looked nice in the viewfinder. I was shooting color slides and so could not see the results on the spot. In the developed color slide the bright blue sky had become a dark jet black and the building became a very light gray (much lighter than it was in reality). That was definitely an unintended consequence. And the lesson is that you may not need to dial the polarizer to the maximum setting to obtain the best photo. With a digital camera it is always a good thing to review any polarized photos on the camera's LCD screen to ensure that you have not overdone the polarizer effect.

When I hike I keep a polarizer filter mounted on each of my lenses, and I take well over 95% of my hiking photos using the polarizer filter. Often the filter is dialed to the max as it often gives the best color saturation. But I sometimes dial the filter somewhere between the minimum and maximum settings based upon a review of my photos on the camera's LCD screen. If I notice in the SLR viewfinder that the polarizer has no effect on my scene, I will remove the filter for that shot. But the most part the polarizer filters stay on each lens as I hike. They double as lens protection, much like many photographers use a skylight filter for lens protection.

Last summer I opened this thread which illustrates the effect of a polarizer filter on foliage.
 
While we're on the subject, what's a good polarizer filter to use for just recreational shooting with a Nikon D50 and a kit lens (30-55mm) or my 55-200 VR zoom? Can someone provide a link to one?

I have a cheap-o sunpak filter that I bought on a lark at Circuit City before they went under, but it doesn't have "settings" (that I can see at least) and it doesn't seem to do much to the photo, so I'm guessing I need something better.

Thanks,
Smitty
 
I have a cheap-o sunpak filter that I bought on a lark at Circuit City before they went under, but it doesn't have "settings" (that I can see at least) and it doesn't seem to do much to the photo, so I'm guessing I need something better.
Settings?

The only "setting" for a polarizer is the ability to rotate it. (There should be a slip joint in the mount that allows rotation.)

Lenses that rotate the front filter mount as they focus or zoom are a bit of a problem--you have to remember to adjust the filter after setting the focus and/or zoom.

Higher quality polarizers (eg Hoya) are coated to reduce reflections, cheap ones (eg Sunpak) tend to be uncoated.

Note 1: many modern auto-focus cameras require a circular polarizer.

Note 2: A polarizer loses about 1 stop of light.

Doug
 
While we're on the subject, what's a good polarizer filter to use for just recreational shooting with a Nikon D50 and a kit lens (30-55mm) or my 55-200 VR zoom? Can someone provide a link to one?

I have a cheap-o sunpak filter that I bought on a lark at Circuit City before they went under, but it doesn't have "settings" (that I can see at least) and it doesn't seem to do much to the photo, so I'm guessing I need something better.

Thanks,
Smitty

You can start here. Double check the diameter of your lens(es).

Little bit of polarizer info if you're interested.
 
Settings?

The only "setting" for a polarizer is the ability to rotate it. (There should be a slip joint in the mount that allows rotation.)

Okay, that's what I have but didn't know if the better filters were marked in some fashion to delineate minimum or maximum effect.

And yes, the ring the filter mounts to rotates during focus. Thanks for reminding me to check my filter after focusing. Now I just have to go out and play with it.
 
Okay, that's what I have but didn't know if the better filters were marked in some fashion to delineate minimum or maximum effect.
Some of them have a dot on the rim that you aim toward the sun. It is better to look through the viewer and rotate until you achieve the best effect. (Or just hold it up to the scene and rotate it while looking through it. This has the disadvantage that you may not be able to see the entire scene.)

Doug
 
Top